Showing posts with label BarryM. Show all posts

BarryM The Glitterati Collection

11 November 2014


Each year in the run up to the party season i look forward to the new cosmetic releases for Christmas and New Year mainly because they are are usually filled with beautiful new collections full of glitter, sparkle and gorgeous glamourous shades, and I'm happy to report Barry M's new party range had not let me down! 
The Gliteratti collection comprises of six new jewel toned glitter shades with equally glamourous names, Catwalk Queen, Fashion Icon, Rockstar, Socialite, VIP and Starlet. When i spotted them in my local Superdrug i couldn't resist picking up three of my favourites as they just jumped out at me. I chose Fashion Icon which has a purple base colour with very fine purple and blue glitter and holographic shimmer, Socialite which has a barbie pink base colour with pink and purple glitter and holographic shimmer and last but not least Catwalk Queen which has a pale aqua base colour with a mixture of blue, green and gold glitter also with a holographic shimmer. 
I have seen people say they wear them over over polish as a topcoat but i don't think thats really necessary, yes they are a glitter polish but they have a base colour too them as well and although quite sheer with one coat after two or three they provide completely coverage and strong opaque colour and will look exactly as they do in the bottle. 
I've tested all three of them out and have had varying results, i first tested Fashion Icon (Purple) and i used two coats, and although this was enough to give me a perfect full coverage i found it started to chip really quickly and i had to do quite a bit of touch up. Catwalk Queen was the next one i tried, i found it required three coats to get the same sort of coverage as Fashion Icon but three coats seemed to massively help with the problem of it chipping and i found it lasted much better. Socialite comes out a lot lighter than it looks so you will definitely need a fair few coats for the full effect i found three was enough. 
I am very much in love with The Glitterati collection the colours are all gorgeous, i doubt i could even pick a favourite of the three, they look amazing and for glitter polishes feel incredibly smooth on the nails, and i also didn't find them too bad to remove another god send, thats my party nails sorted! 

Have you tried the Barry M Glitterati Collection? What did you think?

Palm Tree Nails Tutorial

14 August 2014


I had been meaning to do another nail tutorial for a while now, its not that i didn't have anything i wanted to do, i have a big list of ideas i want to have a go at i just never seem to plan the time to do one.
I wanted to do something tropical as although the current weather may have us believing otherwise it is still Summer! All i had in mind when i started was tropical palm trees and neon colours and this is what i came up with, i think it has a Ibiza vibe to it and i do like it, is it perfect? most definitely not so lets try and ignore the slightly dodgy palm tree on my middle finger... (I'm my defense i only had one fully functioning eye at the time)
So if you want to create my wonky palm tree tutorial yourself keep on reading!


What you need-
If you want to go for a sunrise style ombre base like me, neon colours will look great and really pop i used,
BarryM 322, Orly Peach Pastel Neon and Orly Tennis Ball Neon
You will also need-
A white and black polish,
An old makeup/paintbrush,
Nail art pen in Black,
Makeup sponge,
Topcoat.

Step One-
Apply two coats of a white polish for a base this will make the colours much brighter.
Step Two-
Take your makeup sponge and measure it against your nails cut it to a smaller size to make it easier to use (you should have a small rectangle shape). Take your first colour (pink) and paint a stripe along the top of the sponge, then take your second colour (orange) and paint that below the pink, and finally take your third colour (yellow) and paint that across the bottom. 
Step Three-
Line the sponge up against the nail and gently dab it across the nail, re-apply more polish and repeat on the rest of the nails.
Step Four-
Allow the nails to dry then go over repeating the same process with a second coat, i did three coats on mine so just keep going over until you get the coverage you want.
Step Five-
Once the nails are dry its time to do the palm tree, i only chose to do them on my thumb and middle fingers, you could do every nail if you wanted. 
Step Six-
Depending on what your most comfortable with you could use a nail art pen or a brush to draw on the palm tree, i found the pen too thin so i used a brush for the majority of it.
I poured out a bit of black polish onto some tin foil dipped in the brush, i then started painting the trunk of the tree in the corner of the base of the nail taking it up to make a slightly curved line.
Step Seven-
Dip the brush in some more polish and draw on the palm tree leaves, three each side slanting downward will look best. Draw a small diagonal black line at the base of the nail to look like sand.
Step Eight-
Using the nail art pen draw a few stray thin stray lines coming out of the leaves to make the leaves look more authentic. 
Step Nine- 
Allow the nails to dry completely then add a topcoat to seal. 


I hope that was easy enough to follow, if you want to see pictures of how to do the ombre nails i did a tutorial on it a while back that i will link (here) Let me no what you think (be kind about the funky nail) and comment below if there is anything you would like me to have a go at. 

Pre-Holiday Beauty Preperation

24 June 2014


We all like to look our best when we go on holiday, i don't know if its just me but the thought of spending a week in a bikini is enough to get me in a mild panic and get me doing some serious pre-holiday beauty prep.
So as i'm off on holiday today (yayyy) i thought i would do a post showing you the beauty prep i spent the majority of my day yesterday doing to get myself beach ready!

Exfoliating and Moisturising-
Now this is something i've been trying to keep on top of for the last couple of weeks in preparation, as we all know the best way to get a good even tan natural or fake is to keep your skin fresh, smooth and exfoliated so i have been using my Garnier Oil Beauty Scrub pretty regularly in the shower to keep my skin soft and smooth and too remove all my old fake tan so my skin will be nice and fresh for optimum tanning. The other important thing is to keep the skin moisturized so after scrubbing the skin in the shower i make sure i apply my current favorite the Vaseline Spray& Go body moisturiser which is quick and easy to use and leaves the skin soft an smelling lovely.

Hair Removal-
Obviously when your going to spending the week in very little clothing hair removal is a must you don't want to be the hairy mary by the pool!
Some of you more glamourous and organized ladies may well keep your hair removal in check, if your like me however and only really shave those legs consistently when you A- are planning on wearing a skirt/dress and really have to or B- have a bf (and sometimes not even then) then your going to need to get rid of it, i have pretty sensitive skin so i use a sensitive Nair removal cream for more delicate areas (bikini line) and a sensitive Gillette razor for the rest.

Face and Hair Mask-
So scrubbed moisturized and fur free, i like to have a little pamper a use a face mask to freshen up the skin, the Ren Invisible Pores is one of my favorites to really de-clog the pores and leave the face smooth and clean. Knowing that my hair will be getting a bit of a battering with the not so healthy mixture of heat, chlorine and salt, that holidays bring i like to give my hair a bit of a treat before i go just so it's feeling soft and nourished, i've only used it a few times but i am loving the Philip Kingsley Elasicizer it leaves my hair feeling amazing.

Fake Tan-
Some people may think this is an unnecessary step but to me it is 100% necessary, yes i may be going on holiday to get a natural tan but that doesn't happen instantly, and i personally feel at my happiest with  a bit of colour to my skin, so i like to apply some fake tan before i go to tide me over until my natural tan starts to show through.

Eyebrows-
Im so rubbish with my eyebrows, i hate doing them but luckily they don't seem to grow too out of control if i don't do them regularly, but of course no full body pamper would be complete with out giving the brows a bit of attention, i don't do too much to the shape just pluck any stray hairs.

Mani/Pedis-
Finally no beauty prep can be complete without a bit of attention to those nails. I decided not to paint my nails with normal polish as it just chips so easily when your on holiday so i thought i would use my Sensationail gel kit because it literally lasts weeks without chipping which makes it perfect for holidays. For my feet i will give them a bit of attention with my Avon Foot Scrub to get rid of any dry skin moisturize and apply some fresh polish (i don't think i could manage the gel kit on my toes) i like to use a bright Summery Colour one of my current favorites is BarryM's Papaya.

So thats what I like to do do before a holiday to get me primped, preened and feeling my best. Do you have a pamper day before your holiday? 
What's your routine?


Easter Bunny Nail Tutorial

19 April 2014


Hello lovelies, i've got a cute Easter Nail tutorial for you today. I thought as i had done fun theamed nail tutorials for Halloween and Christmas i had to do an Easter tutorial and what is more fitting than cute little Easter bunnies? 
I apologize for the lack of pictures, i was having camera issues, luckily i managed to get a few of me doing the rabbit on my phone and although their not the best quality they show the steps. 

What you need-
For the Bunny, white, black and pink polish (I used BarryM Matt White, Pale Pink and Rimmel Black Out)
For the Polka Dots, white  and colored polishes of choice,  i went for pastel shades (I used, BarryM Berry, Blueberry, Peach Melba, Gosh Bubble Gum and Topshop Gone Fishing)
Nail Dotter, 
Topcoat (I used a Matt Topcoat from Essie)


For the Bunny-

Step One 
Paint two coats of your background colour and allow to dry.
Step Two-
Taking your white polish paint on a half moon shape at the tip of the nail, allow to dry and then go over with another layer.
Step Three-
Taking the brush of your white polish brush off the excess polish and carefully paint on two lines for the ears almost in a V shape, allow to dry.
Step Four-
Taking the smaller end of the nail dotter dip it into some pink polish and draw two pink lines inside the ears.
Step Five-
Taking the larger side of the nail dotter dip it into the pink polish and dot on the nose, clean the nail dotter then do the same with some black polish and dot on the eyes.
Step Six-
When the nail is completely dry apply the topcoat to seal.

For the Polka Dots-

Step One-
Apply two coats of your chosen colour polish to the nail allowing to dry between coats.
Step Two-
Take the large end of the nail dotter dip it into some white polish and dot on to the nails, i find the best results if you do the dots in lines (Sorry their are no pictures of the polka dot stages the main picture should help to show how i do it)
Step Three-
Allow the nails to dry completely then apply a topcoat.

I hope you liked my Easer tutorial, and found it clear enough, even with the lack of pictures. I hope you all have a great Easter weekend. 


Half Moon Nail Tutorial

10 April 2014


Todays nail tutorial is incredibly simple to do and i think quite effective, you don't need a steady hand its simply a case of using regular nail polish and painting it on the nails. The great thing about the half moon manicure is that its so versatile you can use whatever colour combinations you want, i've gone for a silver foil effect polish as the base (mine is from BarryM) and on top i've gone for a bright orange (BarryM Jelly Nail Paint in Mango) as the top color, i think the combination of a matt foil and a hi-shine polish just makes it a bit more interesting. 

What you need-
x2 Nail polish,
Circle Stationary stickers/ French Manicure tip stickers, 
Top Coat.

Tips-
The top colour should ideally be a darker colour than the base, that way it will cover the base colour evenly without it showing through.


Step One-
Paint two coats of your base polish and allow to dry.
Step Two-
Apply the circle stickers to the base of the nail, pressing down firmly. I've made my half moon shape quite large, if you want it smaller position it further down the nail without leaving any of the base of the nail visible.
Step Three-
Paint two coats of your chosen top colour on to the nails above the sticker, allow to dry between coats.
Step Four-
One the nails are completely dry carefully peel away the stickers.
Step Five-
Apply a top coat to seal.

March Favourites

04 April 2014


Hello lovelies, i cant believe its time for another favorites post already! The last month has just flown by, i feel like i've just been so busy lately, i apologize for blogging less and more randomly than usual and will hopefully get back into a routine soon enough.
The majority of my March favorites are new products that i've purchased in the last few months and am really loving and one is an old favorite.

Sleek i-Divine Original Palette-
I reviewed this palette back in February (Review) and since then i have used it so much. The colours are just so pretty and perfect for spring i actually used a few of the colours in my Spring makeup tutorial (Here) and these are still so many i want to use for different looks. At £7.99 the Sleek eyeshadow palettes are one of the biggest bargains around and i will be picking up more for my collection.

Benefit Gimmie Brow Light/Medium (Full Review) -
I've used this little wonder everyday since i bought it and i cant see that changing anytime soon. It is just great for girls who are pretty low maintenance with there brows like me, just slick it through and your good to go, love it.

Bourjois Colour Boost Lip Crayon in Orange Punch-
I used to use this along with the coral from the collection Peach on the Beach non stop last summer i also took them away on holiday as their perfect for a pool perfect pop of colour, and then i think over winter i brought out the dark vampy reds and forgot about it, until now that is! Orange Punch is just a great flattering colour and there so glossy and moisturizing. Orange lips are so on trend and this could be a great alternative if your wanted to try the trend but aren't brave enough for a full on orange lipstick.

BarryM Aquarium Collection Polishes-
I reviewed these polishes a few weeks back (Review) and i am still completely in love with them. I get so many compliments on my nails when wearing them, their just such interesting beautiful colours, the glitter top coats from the collection are also great.

Mac Hue Lipstick-
I wrote a post about this lipstick a few months back in-titled my perfect nude, and it very much still is!
I wear this lipstick all the time i'm obsessed with the colour, its a great everyday nude, and my go to lipstick for a night out if i'm going for a bold eye look. I love how moisturizing it is with such a nice finish i definitely want a few more Mac glaze lipsticks in my collection.

So thats what i've been loving lately, i no it was a very makeup orientated but i haven't really changed up my skin-care routine in a while so their are new favorites in that area. 
What have you been loving lately?

If anyone is interested in buying anything from Crown Brush i have a discount code to get you 10% off just shop using the following link (Here) and enter the code FINGC2014.  Happy shopping lovelies! 

My top Spring nail polishes

27 March 2014


I did one of these posts back in October with my top Autumn nail polishes and so i thought i would make it a seasonal thing and bring you my top nail polishes for spring. 
For me when i think of spring i think of the new flowers particularly daffodils, and baby animals, its all fresh and full of life. In colours that translates to me as a mixture of pretty pastels and a few vibrant shades. 

Topshop 3D 203-
I had to pick a glitter as i do love a glitter polish! This beauty is a really pretty mixture of very fine glitter in clear polish, its mainly a sort of green colour but in the light it looks multicolored and holographic. 

Essie Madison Ave-hue-
This is such a pretty pink, it was actually from Essies spring collection last year. the colour makes me think of roses, it also has a very light barely detectable shimmer to it. 

Rimmel Lemon Drop-
No spring nail picks could be without a yellow it just makes me think of cute little chicks, ahh... This is just the perfect pastel yellow its also has good coverage for such a light shade. 

BarryM Blueberry-
Not quiet a pastel but not too bright either this is such a nice blue, it may be called Blueberry but it reminds me of Bluebells.

Bourjois Amande Defile-
This is a lovely fresh colour for spring its in-between a mint green and an apple green, just a lovely green colour really.

BarryM Papaya-
I love this gorgeous vibrant peachy/orange its bright and perfect for Spring, orange is everywhere for lips at the moment so why not rock it on your nails too. 

Topshop Chase-
This is probably my favorite Topshop nail polish its just so pretty, the prefect lilac with a gorgeous shimmer. 

I hope you like my top picks for spring nails, what will you be wearing on your nails this spring?


BarryM Aquarium Collection

16 March 2014

Pacific/Mermaid/Mediterainian/Treasure Chest

I had been so well behaved lately and had been managing to avoid random beauty purchases in Superdrug or Boots...mainly by avoiding them both completely but still. That was until i had to make a trip to the pharmacy in Superdrug, i spotted these little beauties from the new BarryM collection and due to my large weakness for nail polishes (seriously their like my cryptonite) they ended up coming home with me.
The new BarryM Aquarium collection features six nail polishes, four two-tone shimmer polishes and two glitter top coats which contain the coordinating colours of the polishes. I picked up four from the collection the two glitter top coats and my favorite two polishes.

AQNP6 Pacific-
Pacific is a blue polish with a green sheen.

AQNP1 Mermaid-
Mermaid is a glitter top coat consisting of clear polish with blue, green and gold irregular foil glitter particles.

AQNP4 Mediterranean-
Mediterranean is a copper polish with a pinky/gold sheen to it.

AQNP2 Treasure chest-
Treasure Chest is a glitter top coat consisting of clear polish with rose and gold irregular foil glitter particles.

The polishes are just the most gorgeous colours i cant even decide which one is my favorite, and the duo chrome finish looks so pretty when it catches the light. Their quite thin in consistency so they definitely require two plus coats for a good even finish i used three in the swatches above.
The glitter in the top coats is chunky but will definitely also require a few coats for a full finish. Paired together the polish and topcoats result in a striking finish, i really do love them i'm just trying to convince myself now that i don't need the entire collection...

The new BarryM Aquarium Collection are £3.99 each and are currently two for £6.00 in Superdrug. 
Which colours your favorite?


2013 Beauty Favorites, Skin, Hair and Nails

11 January 2014

My first 2013 favorites post went up on wednesday, featuring my favorite makeup products from the year, this is the follow up post featuring my favorite beauty products from 2013.
With makeup i find like most women i suppose you may have a favorite lipstick or eyeshadow but i expect you have a lot of each of the those things at one time that your using, whereas with beauty products like moisturizers and face washes like me, you probably go through a few different ones in a year but you use them one at a time, thats why i think beauty favorites are interesting because to repurchase a product and not try something new means it has really impressed!
I've picked the skin, hair and nail beauty products that have stood out to me the most the past year, that i would repurchase, some i have already and will be continuing to use through 2014. 

Skin
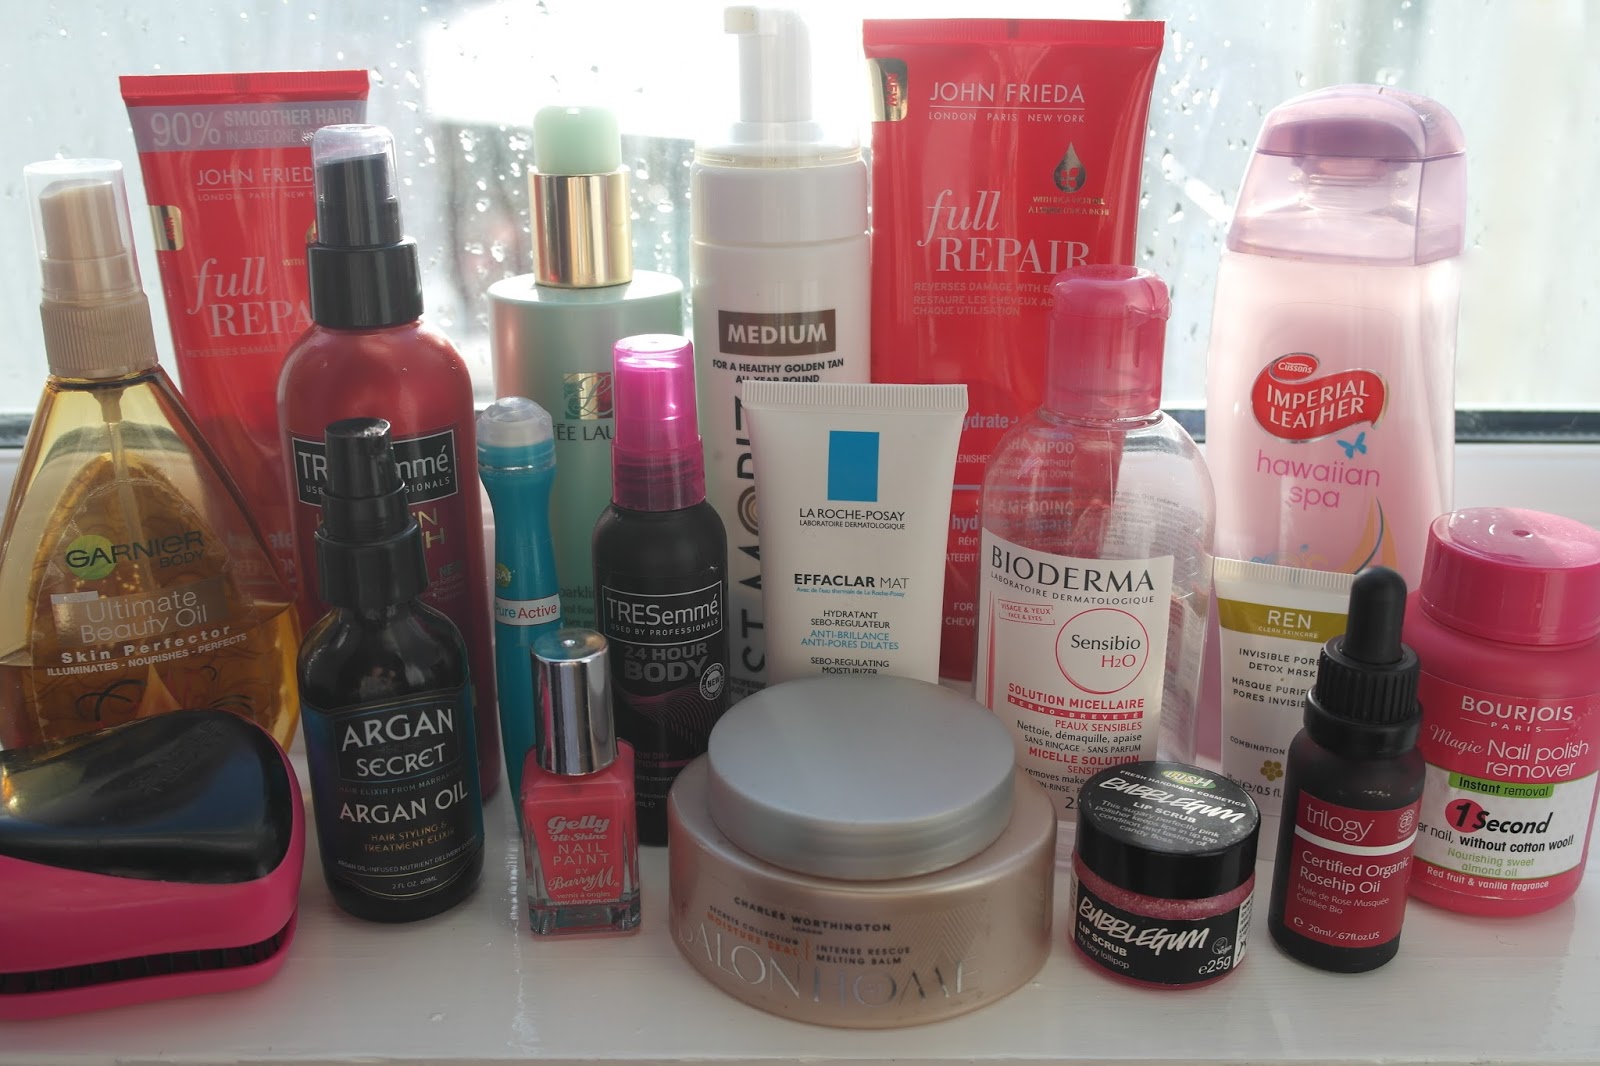
Bioderma Micelle Solution-
This is without a doubt one of my favorite discoveries of 2013, i haven't used anything else to remove my makeup since i first tried it. It removes my makeup so well, doesn't hurt my eyes at all and is really gentle on the skin.

Estee Lauder Sparkling Clean Cleanser-
I am a massive fan of Estee Lauder skin care, this may be quite pricey for a face wash but it has lasted me all year. Its targeted at oily skin and is really gentle yet cleans the skin really well.

La Roche-Posay Effaclar Mat-
I am on my second tube of this moisturizer now which speaks volumes for a moisturizer as i usually change them all the time and rarely re-buy the same one, i just love how light and fresh this feels on my skin and it really does help to mattify.

Ren Invisible Pores Detox Mask-
I've tried a lot of clay masks this one stood out to me, it really does make my skin feel unclogged and completely fresh how it should feel after a face mask.

Trilogy Rosehip Oil-
This is the first oil i have ever used on my face, i found it a bit strange to begin with putting oil on my oily skin, but i am completely in love with it. Its great for getting rid of redness and scaring from spots, and i wake up with my skin glowing after using it.

Garnier Pure Active Roll-On-
This helps to reduce inflammation from spots and isn't harsh on the skin, also helps with any marks left behind.

Imperial Leather Shower Cream-
I don't have particular favorite just the Shower Creams in general all smell amazing and leave my skin feeling nice and soft.

Garnier Ultimate Beauty Oil-
Perfect for lazy girls like me...just spray and go! This smells so good and it sinks in well,  leaving you with a gorgeous glow to the body and doesn't leave you sticky.

St. Moriz Instant Self Tanning Mouse-
My favorite beauty bargain, a massive bottle for £4.99! I've never had any trouble with this streaking and i love the colour it gives.

Lush Bubblegum Lip Scrub-
This is great at freshening up dry lips giving a better base for lipstick, and you can eat it, amazing! It tastes like sweets.

Hair
John Frieda Full Repair Hydrate+Rescue Shampoo*-
I was sent this shampoo to try and i fell in love with it, it leaves hair soft nourished and smelling great.

John Frieda Full Repair Hydrate+Rescue Deep Conditioner-
I also got sent the normal conditioner version of this and i really liked it too, when i used it up i bought the Deep conditioner to try and i have been using this as my conditioner instead of a mask.

Charles Worthington Intense Rescue Melting Balm-
You have to warm this balm up in your hands to make an oil which you apply to your hair as a mask and leave on for 20 mins, it leaves the hair feeling amazing definite must try!

Treseme 24 Hour Body Blow Dry Lotion-
I love the volume this gives me at my roots, yet still leaves the hair feeling light like there's no product in it.

Treseme Keratin Smooth Heat Protection Spray-
I no its quite hard to judge if a heat protectant spray is actually doing it job, this has been my favorite out of a few i've tried because it doesn't leave my hair crispy or greasy looking even if i'm spraying it on dry hair.

Argan Secret, Argan Oil*-
My best friend had two of these so she gave me one to try, bless her cottons! It was the first proper hair oil i had used and it really did the trick of sorting out my dry ends. Its very thick yet doesn't make the hair look greasy, i'm also obsessed with the smell. I've tries a lot of other oils since but this just feels very luxurious in my hair.

Tangle Teaser-
I don't use a normal brush or comb anymore, tangle teasers are so much gentler on the hair and you can use them on wet or dry hair. Can't see myself ever going back to a normal brush again.

Nails
Bourjois Dissolvant Miracleux-
This nail polish remover has made my life a lot easier, nobody likes spending forever taking the old polish off and this makes it really quick even with stubborn glitter polishes.

Neom Complete Bliss Organic Hand Cream-
I am not the best person at remembering to moisturize my poor hands, but when i do this is my favorite it jut smells so yummy, oh and it makes my hands feel soft too...

BarryM Gelly Polish-
It was really hard to pick a favorite polish, i love my nail polishes and i have a billion that i could call my favorites but as i have to pick i would say the BarryM Gelly polishes are great, they look like gel,  there is a great colour selection, and there only £3.99 each!

Wow so there you have it my favorite beauty products from 2013, that turned out to be a long post, if you actually stuck with me and read my ramblings right to the end, well done. 
Have you tried any of my favorites? What are your favorite beauty products from the year?

Zoe
X

Christmas Nail Tutorial

14 December 2013


Hey lovelies, I'm finally getting into the festive spirit of things and so i thought i would do a christmas nail tutorial! I wanted to go for something fun and so i picked a few of my favorite christmas characters, i've done something different on each nail but i've shown the steps for each separate nail design so you can do five of the same/different or mix and match your favorites!


The Kit-
This is what i used for the nails designs,
Nail pens- Models Own nail art pens in, Black, White and silver.
Nail Dotter,
Topcoat- Nails Inc Kensington Caviar Topcoat.
Nail Colours- BarryM Matt White, Rimmel Black Out, Essie Not just a pretty face, BarryM Blueberry, Rimmel Sunshine, Nails Inc Jermyn Street, Nails Inc Bennett Street, BarryM Vanilla, BarryM Mango. 


Snowflake Nail
Step 1- Pant two coats of the blue polish and let it dry.
Step 2- Using the striper part of the white nail art pen (could also use a small makeup brush dipped in polish) draw a cross at the tip off the nail.
Step 3- Draw a line through the cross to make the six sided snowflake shape.
Step 4- Draw two small dashes coming off the end of the six lines.
Step 5- Using the nail dotter in white polish, dot on some snow across the rest of the nail.
Step 6- using the silver nail art pen make small dots in the remaining spaces.


Penguin Nail
Step 1- Paint on two coats of the black polish, allow to dry.
Step 2- Take the white polish and paint from the middle to the tip of the nail white, leaving the sides black, let it dry and go over again.
Step 3- Using a nail dotter dipped in white polish make two large dots for the eyes, let it dry.
Step 4- Using the smaller end of the nail dotter dipped in black polish dot on the center of the eyes.
Step 5- Using the nail dotter dipped in yellow polish dot on three dots in a small triangle and fill in the middle to make the beak. 


Rudolph Nail
Step 1- Paint on two coats of the brown polish, allow it to dry.
Step 2- Using a nail dotter dipped in red polish dot on a large circle for the nose.
Step 3- Using the nail dotter dipped in white polish make two large dots for the eyes, let them dry.
Step 4- Using the smaller end of the nail dotter dipped in black polish dot on the center of the eyes. 
Step 5- Using a nail dotter dipped in a lighter brown polish dot and drag two lines for the antlers with two smaller lines coming off them. 


Snowman Nail
Step 1- Paint two coats of the white polish, allow to dry.
Step 2- Using the large end of the nail dotter dipped in black polish dot on the eyes.
Step 3- Using the nail dotter dipped in orange polish dot on three small dots in a long thin triangle shape for the nose and fill in.
Step 4- Using the small end of the nail dotter dipped in black polish dot on the stones for the mouth in a semi circle shape. 


Father Christmas Nail
Step 1- Paint on one coat of white polish as a base to make the skin colour stand out, allow to dry.
Step 2- Paint on 1-2 coats off your pink polish, let it dry.
Step 3- Paint a stripe of red polish along the base of the nail.
Step 4- Paint from the middle of the nail down to the tip white, with two slightly longer bits at the side for his beard.
Step 5- Using the nail dotter dipped in white polish dot on a line of dots along the top of the red stripe to make the trim of his hat, and make a larger dot on one side for the bobble. 
Step 6-Using the larger end of the nail dotter dipped in white polish dot on the eyes, let them dry.
Step 7-Using the smaller end of the nail dotter dipped in black polish make two dots on the center of his eyes.
Step 8- Using the nail dotter dipped in pink polish dot on his nose


To finish apply a topcoat to seal in all together and your done!

I hope you like my festive Christmas nails, which one is your favorite?
Zoe 
X

Halloween Nail Tutorial!

27 October 2013


Hello lovelies, its Halloween next week and so i wanted to do a Halloween theamed tutorial for you. I had a bit of a play around and came up with this fun design, i've done something different on each nail so if you wanted to have a go you could do a different design on each nail the same as me or you could mix it up a bit and do all of one design or mix and match your favorites. 


What I Used-
Glitter nail- Rimmel Black Out, BarryM Black Multi-Glitter,
Frankenstein- BarryM Key Lime,
Pumpkin-  BarryM Mango,
Mummy- BarryM Vanilla,
Spider web- Bourjois Purple fiction,
Models Own Nail Art Pen in Black and White,
Nail Dotters. 


Step One-
Paint two coats of polish on each nail, black on the pinkie, green on the ring, orange on the middle beige on the index and purple on the thumb nail, and allow to dry. 


Step Two-
To make the frankenstein nail, 
Take the black nail art pen and draw a zigzag line at the base of the nail to make his hairline and fill in the space.
Take a nail dotter dipped in white polish to make two circles for his eyes.
Draw a straight black horizontal line for his mouth with the nail pen and draw vertical dashes coming off the line.
When the white is dry use a smaller nail dotter to dot black into the center of the eyes.

Step Three-
To make the pumpkin nail,
Using the black nail pen draw two triangles in the center of the nail for eyes.
To draw the mouth draw a horizontal zigzag line and then go over the same line to make it thicker.


Step Four-
To make the mummy nail,
Using the striper brush part of the nail pen draw a series of horizontal lines across the nail.
Towards the top of the nail use a nail dotter dipped in white polish to make the eyes.
Fill in the the area around the outside of the eyes with the black nail pen.
When the white is dry, dip a smaller nail dotter in black polish to finish off the eyes.
Draw on a few diagonal lines in-between the lines to finish off the bandages.


Step Five-
To make the spider web,
Using the striper brush in the white nail pen draw three diagonal lines spanning out from the corner of the nail.
Link the three lines together to make the outline of the web.
Fill in the rest of the web. 


Step Six-
Add two coats of black glitter to the pinkie nail, when all nails are completely dry apply a topcoat to finish. 

I hope you like my halloween tutorial,

Zoe
X

How to, Aztec nails Tutorial!

05 August 2013


Hello lovelies, i wasn't planning on doing a nail post today however i had a bit of free time this afternoon so i grabbed my nail bits and my camera and decided to have a little play with my nails. This is the first time i have attempted an aztec print so it was a bit of an experiment for me, the finished result isn't perfect but i am still pretty happy with the way its turned out, its eyecatching, bright and summery.

What i used-
Base colour- BarryM Gelly nail paint in Greenberry,
Models Own nail art pen in Black,
Models Own nail art pen in White,
Topcoat- Nails Inc caviar topcoat.
Nail dotter.


Step one-
I applied two coats of my base colour Greenberry. 


Step two-
Using the striper in the white nail art pen i drew three lines across each nail, i tried to make them all different sizes, i went over the top line to make it  the widest.


Step three-
Using the striper in the black nail art pen i outlined the widest white line at the top of the nail and drew a line above the top of the bottom white line.


Step four-
Using the pen nib of the black nail art pen, i drew little up and down lines over the widest white line at the top of the nail, to make little triangle shapes. 


Step five-
To finish the design, i used the black and white nail art pens to add dots and dashes to fill in the remaining spaces over the nail, i did black dots inside the triangles, white dots along the bottom black line, with black dashes coming up from that line. I then used a nail dotter to do a line of bigger white dots across the remaining space in the middle. When the design was dry i applied my topcoat. 

I hope you like my aztec nails, definitely give them a go they would look so good in all sorts of different colours and patterns. 

Zoe
X 

Related Posts Plugin for WordPress, Blogger...