Showing posts with label Nails Inc.. Show all posts

How to, Aztec nails Tutorial!

05 August 2013


Hello lovelies, i wasn't planning on doing a nail post today however i had a bit of free time this afternoon so i grabbed my nail bits and my camera and decided to have a little play with my nails. This is the first time i have attempted an aztec print so it was a bit of an experiment for me, the finished result isn't perfect but i am still pretty happy with the way its turned out, its eyecatching, bright and summery.

What i used-
Base colour- BarryM Gelly nail paint in Greenberry,
Models Own nail art pen in Black,
Models Own nail art pen in White,
Topcoat- Nails Inc caviar topcoat.
Nail dotter.


Step one-
I applied two coats of my base colour Greenberry. 


Step two-
Using the striper in the white nail art pen i drew three lines across each nail, i tried to make them all different sizes, i went over the top line to make it  the widest.


Step three-
Using the striper in the black nail art pen i outlined the widest white line at the top of the nail and drew a line above the top of the bottom white line.


Step four-
Using the pen nib of the black nail art pen, i drew little up and down lines over the widest white line at the top of the nail, to make little triangle shapes. 


Step five-
To finish the design, i used the black and white nail art pens to add dots and dashes to fill in the remaining spaces over the nail, i did black dots inside the triangles, white dots along the bottom black line, with black dashes coming up from that line. I then used a nail dotter to do a line of bigger white dots across the remaining space in the middle. When the design was dry i applied my topcoat. 

I hope you like my aztec nails, definitely give them a go they would look so good in all sorts of different colours and patterns. 

Zoe

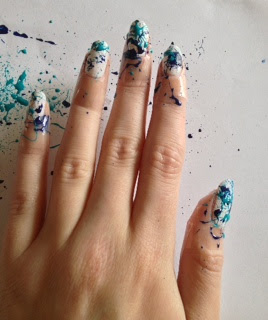
Nail Tutorial, Paint splattered nails!

30 June 2013


I wanted to try something new with my nails so i decided to do a bit of experimenting. I had seen people do this sort of splattered look so i thought i would try it for myself. I was quiet impressed with the finished look, i think its eye catching and different. Its pretty simple to do the only thing is it is quiet messy...


The kit
This is what i used to create the look.
Paper or something to put down as its very messy,
Straws x4 (forgot to put in pic),
Tape,
Scissors,
Topcoat-
I used Nails Inc Caviar topcoat,
Nail colours-
I used Barry M- Matt white, Guava, Greenberry and Rimmel- Blue me away and Sunshine.


Step one
To start with i painted my nails with two coats of my base colour, i chose white as i thought it would make the other colours really stand out. To save the amount of nail varnish you get all over you fingers its a good idea to stick tape around your nail beds, i personally found this the most time consuming and most fiddly bit but saves having to scrub it all off after.


Step two
I cut the straws in half  to make them easier to use. I took the straw and dipped one end into my first colour which was the darkest blue, aimed the straw over the nail and blew on the other end of the straw, it took a few goes to get used to it but the picture shows what the first layer looked like. 

  
Step Three
I took a clean straw so i didn't mix colours in the bottle, and dipped the end in my second colour a lighter blue, and blew over each nail.


Step Four
I took another clean straw and dipped it in my third colour a bluey green and blew that over each nail.


Step Five
I took another clean straw and dipped it in my fourth and last colour a bright yellow and blew that over over each nail. I then removed to tape and waited until my nails were almost completely dry to then add the topcoat to complete the look. I did have to clean a bit of nail varnish off my fingers but the tape defiantly saved a lot of mess.


The finished look!
I was really pleased with how it looks and will defiantly try it again and see how it looks with different colours. 
I hope you like them! Has anyone else tried this technique? 

Zoe
X


Related Posts Plugin for WordPress, Blogger...